


Let’s have a look at each icon, starting from left:
● ![]() Tap here to view the conversion history
Tap here to view the conversion history
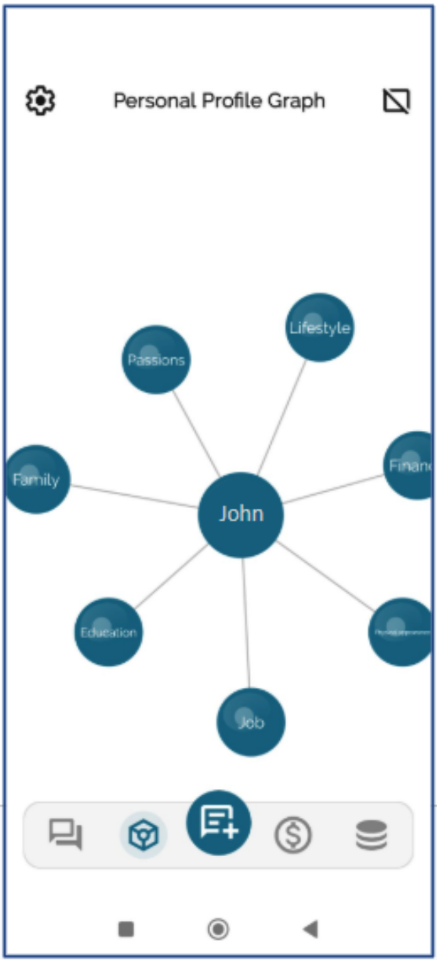
● ![]() Tap here to see your Personal Profile Graph. If you want to get more personalized answers, enter your data into the graph to help Maia know you better.
Tap here to see your Personal Profile Graph. If you want to get more personalized answers, enter your data into the graph to help Maia know you better.
●  Tap here to open a new chat.
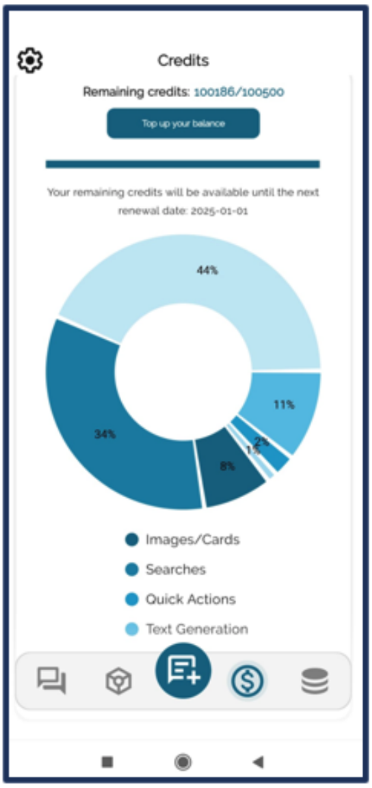
● ![]() Tap here to see the number of Maia Credits that have been spent so far.
Tap here to see the number of Maia Credits that have been spent so far.
●  Tap here to open the Uknow section, where you can store your documents and ask Maia about their content, without the need to read them all.
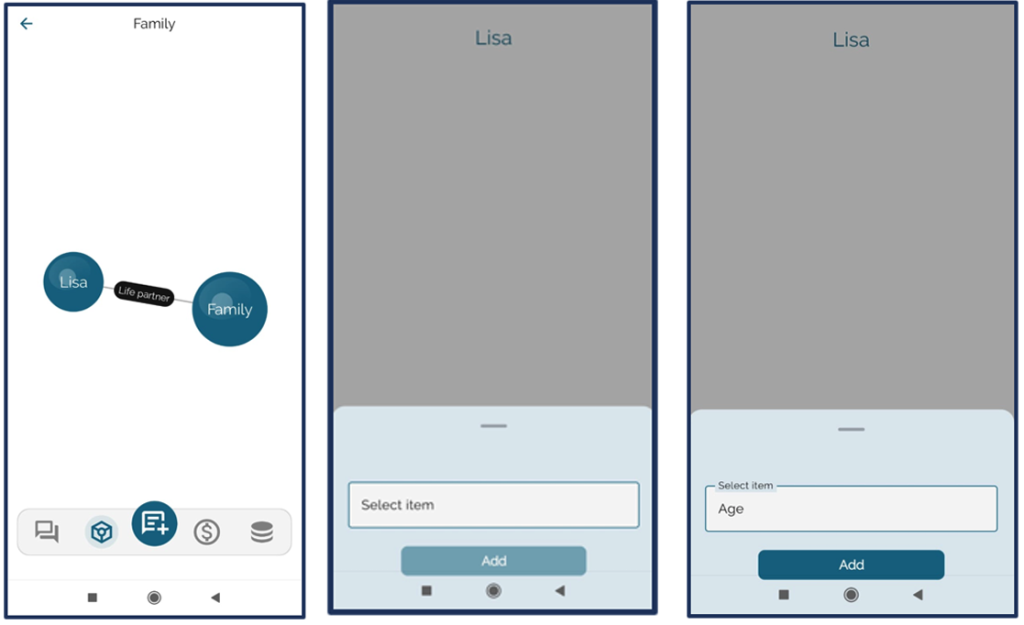
3.1 Personal Profile Graph ![]()
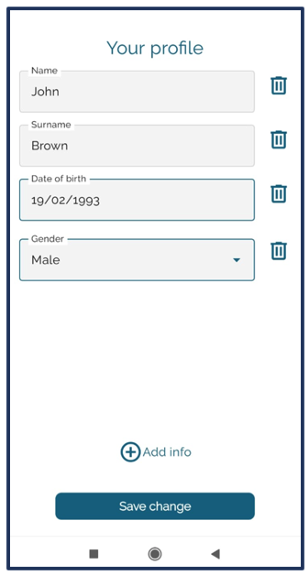
Once you tap the central NODE, you will see a screen featuring your name, surname, gender and date of birth. These data are already part of your graph as they were automatically added during registration. Tap “Add info” ![]() and choose from the list to enrich this category further. In this specific case, the information that has been left out is “Address” and “Residence”.
and choose from the list to enrich this category further. In this specific case, the information that has been left out is “Address” and “Residence”.
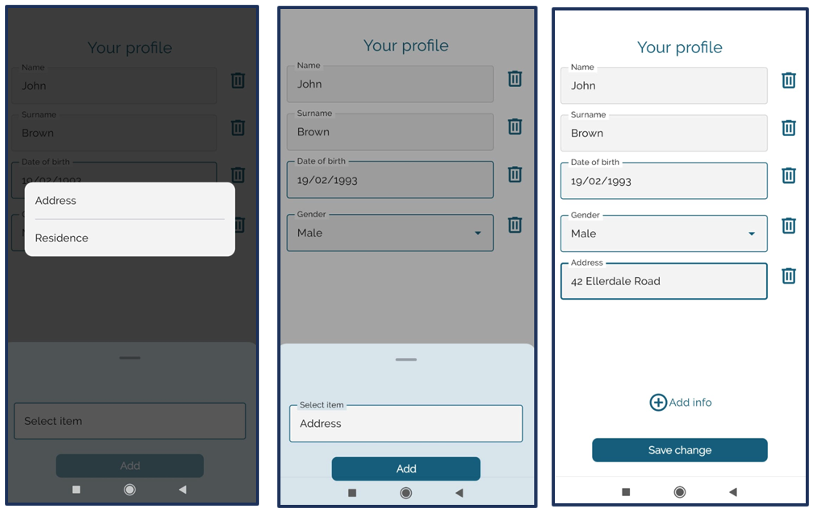
If you want to enter your address:
– Tap “Add info”
– Tap “Select item”
– Select “Address” from the option list
– Tap “Add”
– Type the address into the provided box
– Tap “Save change” to save the information
For each NODE, you will need to follow the same steps if you want to input your data into the graph.
1) In the menu, tap the second button from the left![]()
2) Tap the “NODE” where you want to add information, for example, “John”
3) Tap “Add info” > “Select item”
4) Select one of the items from the list, for example, “Address”
5) Tap the “Add” button
6) Enter the information, for example, “42 Ellerdale Road”
7) Tap “Save change”

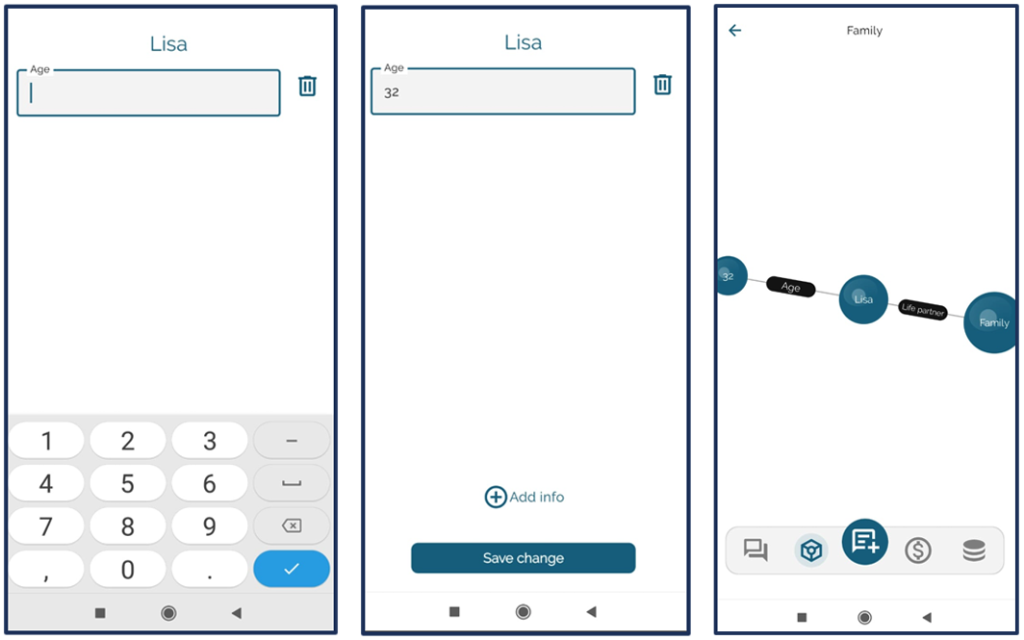
Note: You can delete the information you entered anytime by tapping on the trash
icon ![]() found next to each data.
found next to each data.
If you don’t want certain NODES – for categories like Physical Appearance, Education, Job, Family, Passions, Lifestyle, or Finance – to be shown in your PPG, you can turn them off by tapping the ![]() icon in the top right corner.
icon in the top right corner.
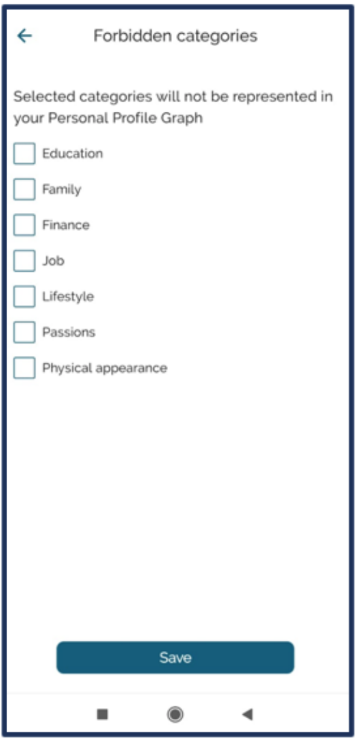
To disable them, check a NODE box and tap “Save” ![]() . By doing so, the NODES you selected will no longer appear in your Personal Profile Graph.
. By doing so, the NODES you selected will no longer appear in your Personal Profile Graph.
1) Tap the![]() icon in the top right corner
icon in the top right corner
2) Choose the NODES you don’t want to be displayed on your graph
3) Tap “Save”
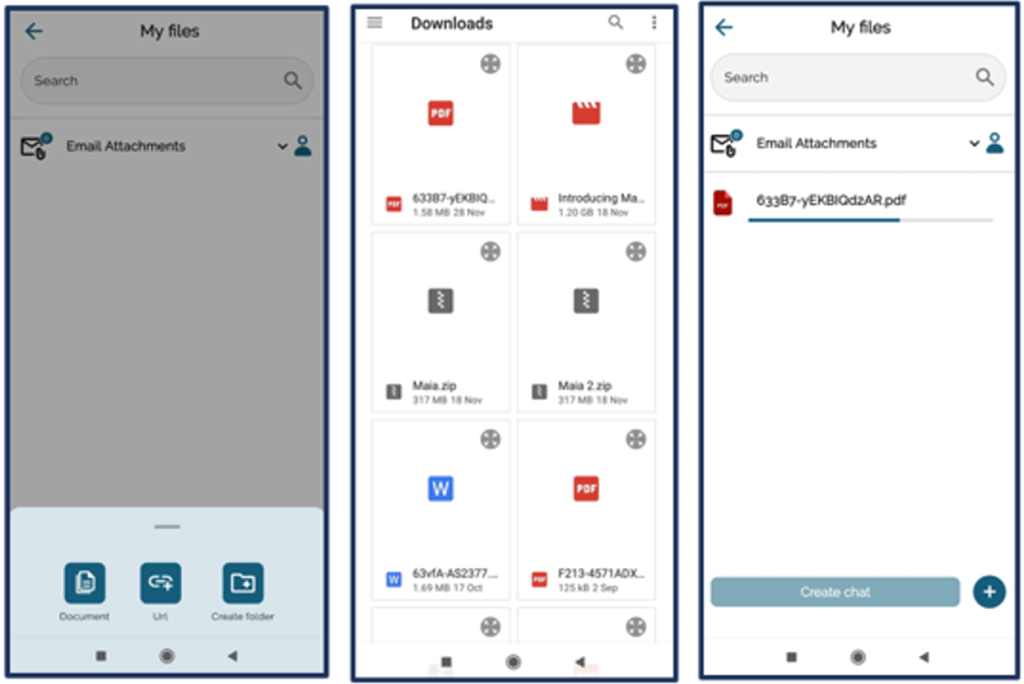
Tap the ![]() button in the menu to open a new screen where you can upload your files.
button in the menu to open a new screen where you can upload your files.
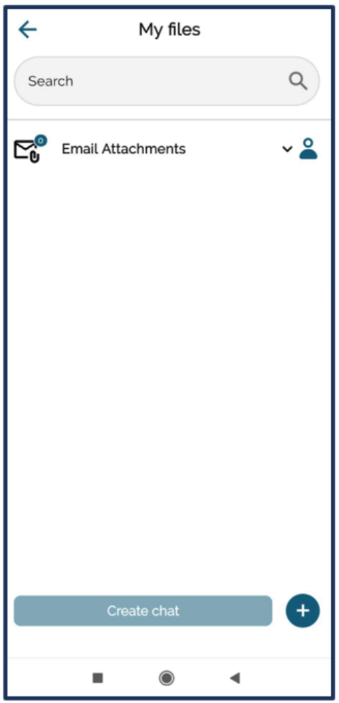
Tap the ![]() icon in the bottom left to see the following screen:
icon in the bottom left to see the following screen:
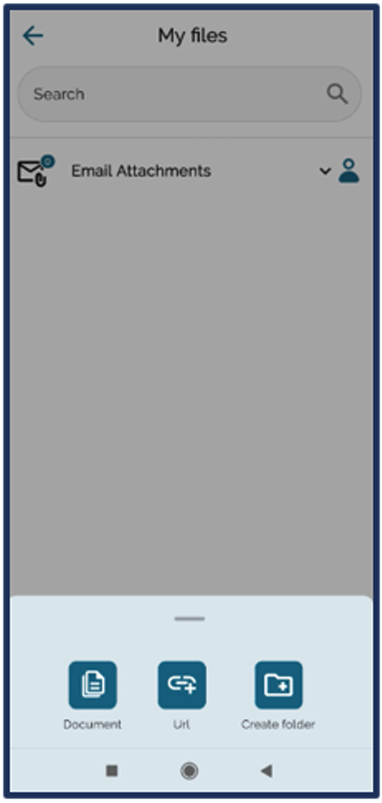
Upload documents
Tap “Document” to open your phone storage and choose the file you want to upload.
Please note that the system allows file uploads up to a maximum of 5 MB.
Once you select a file, a screen will appear displaying the document in the “My files” section as it uploads.
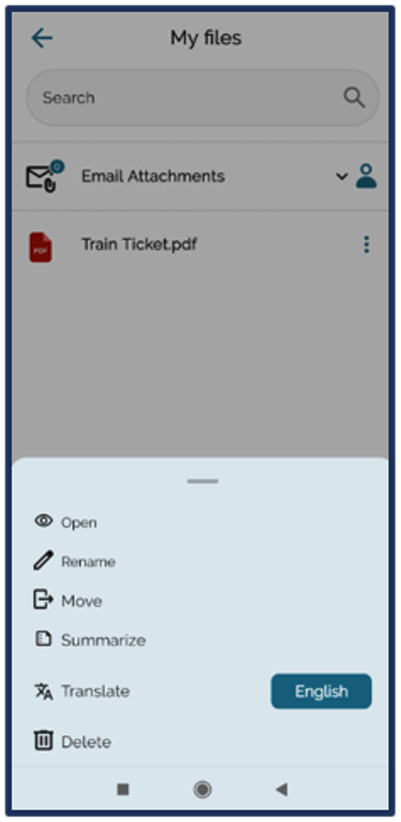
Next to the uploaded file, you will see a three-dot ![]() icon featuring various options that allow you to:
icon featuring various options that allow you to:
– Preview the file
– Rename the file
– Move the file
– Summarize the file
– Translate the file. Next to it, you will see a button that allows you to select the language.
– Delete the file
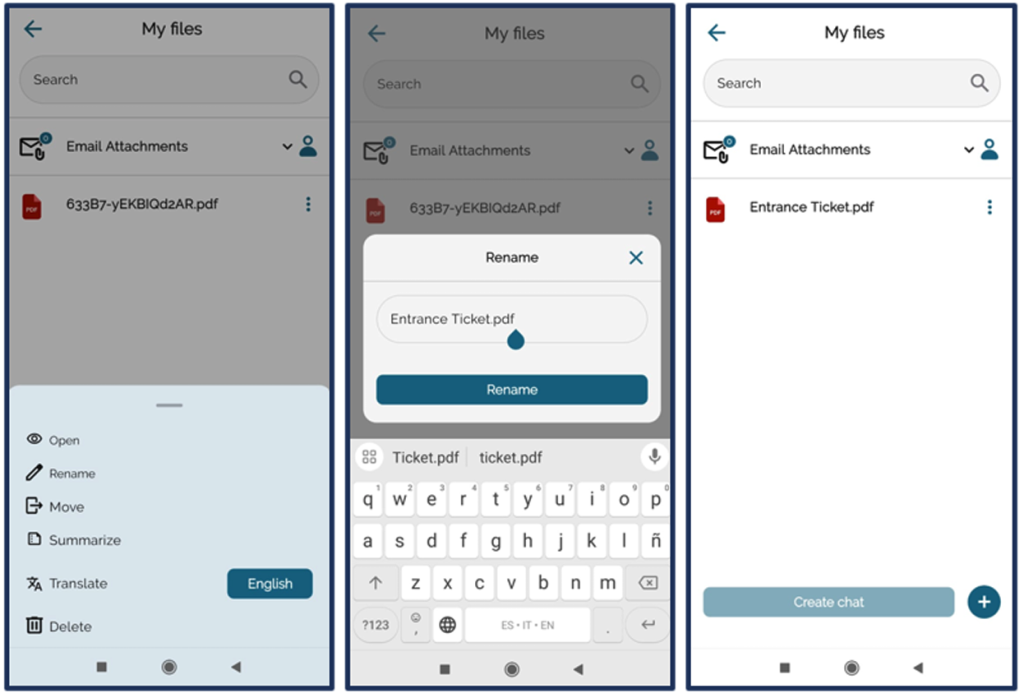
In our example, we have selected a document and renamed it by first tapping the
three-dot ![]() icon and then “Rename”.
icon and then “Rename”.
You can easily send email content or any attachments you have received via email. Forward the email to [email protected] to add the email content and/or any attachments to “My files”.
1) Tap the ![]() button in the menu
button in the menu
2) Tap “Document”
3) Choose the document you want to upload
4) Wait until the document is fully uploaded
1) Tap the three-dot icon ![]() which is located next to the document you want to rename
which is located next to the document you want to rename
2) Choose “Rename” from the option list
3) Type the name
4) Tap “Rename”
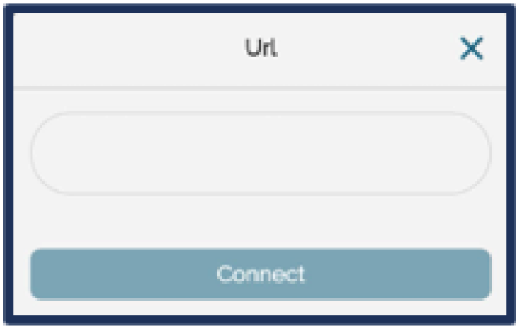
1. Tap the ![]() button in the menu
button in the menu
2. Tap “URL”
3. Paste the web address you want to add
4. Tap “Connect”
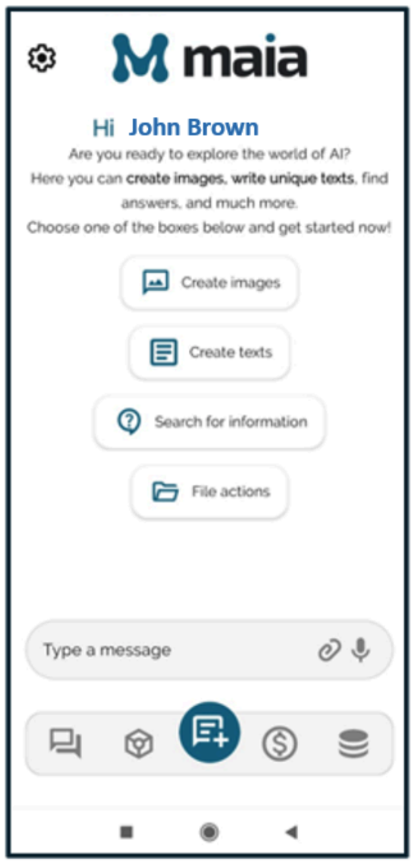
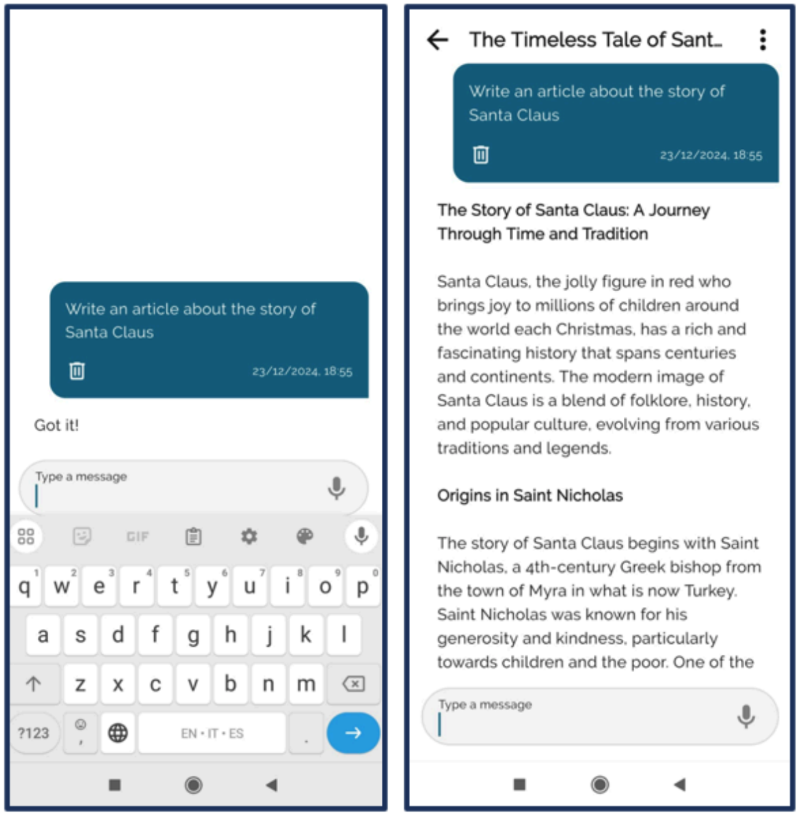
Maia offers a wide range of features, from searching the web for information and generating unique images to creating personalized text—whether it is a quick paragraph or more detailed content. It can also interact with the files you upload to your storage space.
Let’s take a look at some examples and see how these features work in practice.
As previously explained in Chapter 2.4, clicking the ![]() button opens the section where you can start using Maia and discover all its features.
button opens the section where you can start using Maia and discover all its features.
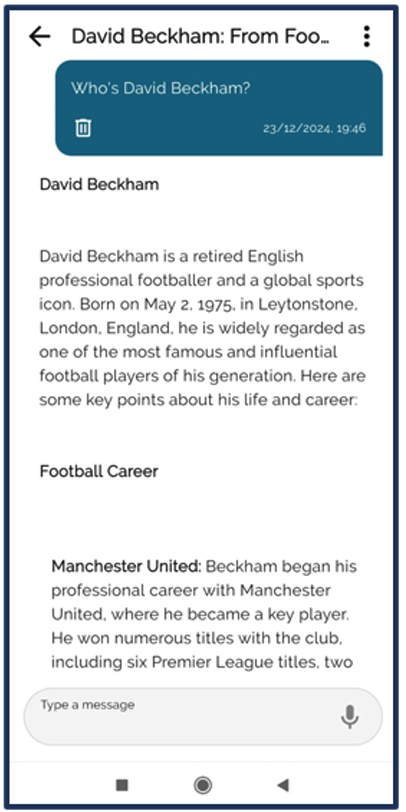
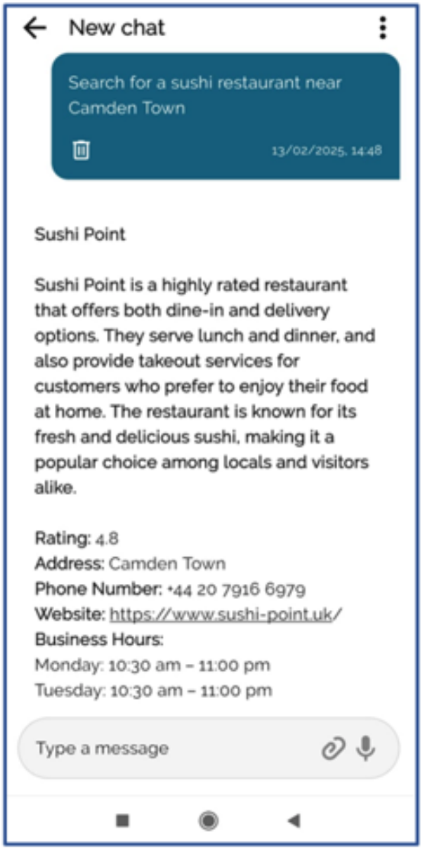
If you want to perform a web search and ask for information or advice, simply type your request into the search box. Alternatively, you can use your voice to interact with Maia by clicking the microphone icon ![]() .
.
In this section, you can ask Maia questions and receive answers based on information found on the web. Please remember that, if you activate geolocation and complete your Personal Profile Graph, Maia will be able to provide highly customized answers. Besides web searches, here you can do local searches and ask personal questions and interesting facts about Maia. Finally, you can also ask about your information to see how much Maia has learnt about you.
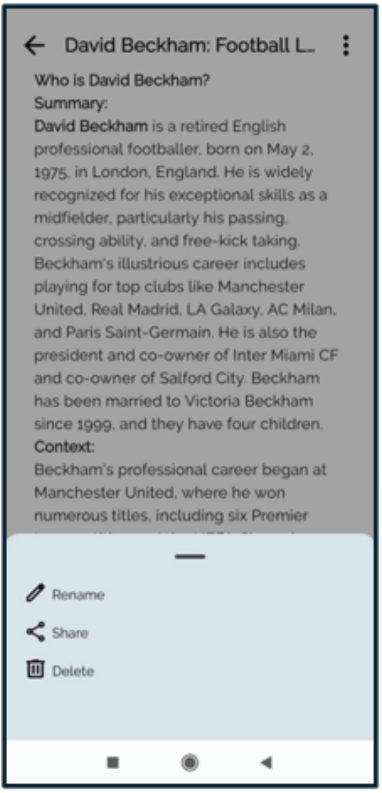
Clicking the three dots ![]() in the top right opens a menu that allows you to:
in the top right opens a menu that allows you to:
– Rename the conversation
– Share the conversation
– Delete the conversation
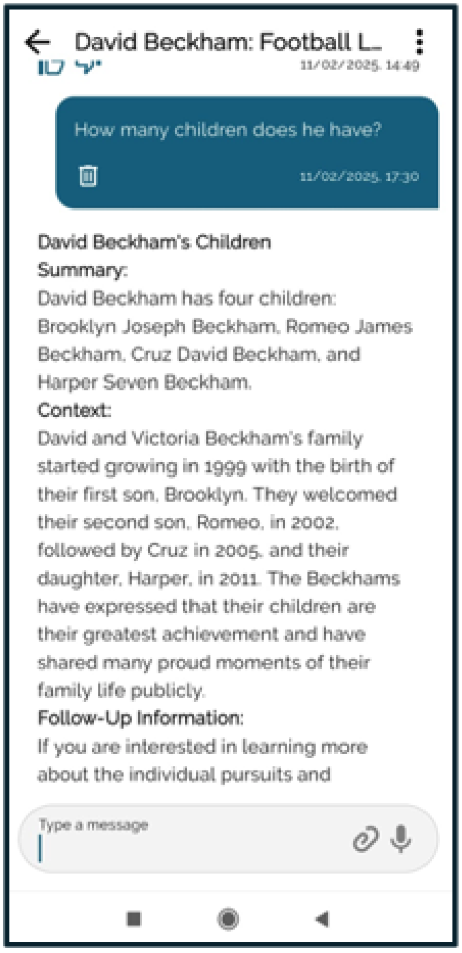
When we talk about sharing, we mean that users can share an entire conversation via a link. By clicking the ![]() icon, the device will show a list of apps—such as Quick Share, WhatsApp, Instagram, and Chrome—where you can choose to share your conversation.
icon, the device will show a list of apps—such as Quick Share, WhatsApp, Instagram, and Chrome—where you can choose to share your conversation.
Finally, the ![]() buttons allow you to rate the answer: a thumbs-up for positive feedback and a thumbs-down for negative feedback.
buttons allow you to rate the answer: a thumbs-up for positive feedback and a thumbs-down for negative feedback.
1) Tap the ![]() button from the home screen to open a new chat
button from the home screen to open a new chat
2) Type your question in the search box
3) Tap the send button
Types of search:
– Web search
– Local search
– Personal search
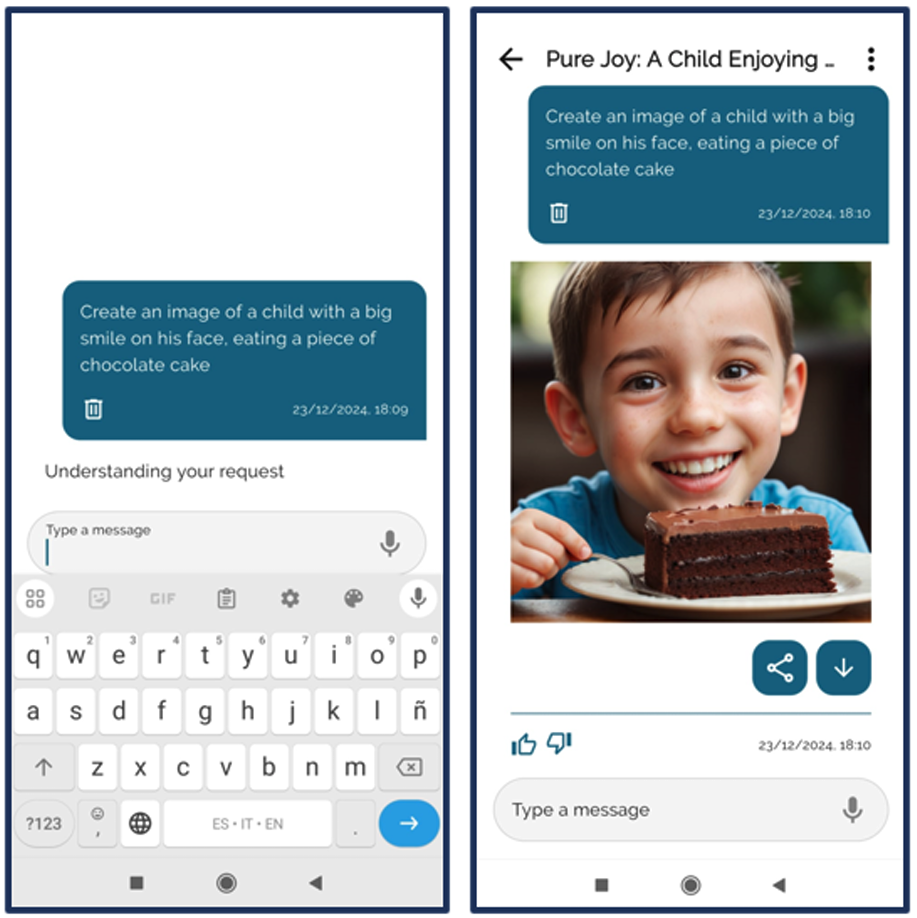
1) Tap the ![]() menu button to open a new chat
menu button to open a new chat
2) Write your image prompt
3) Tap the send button
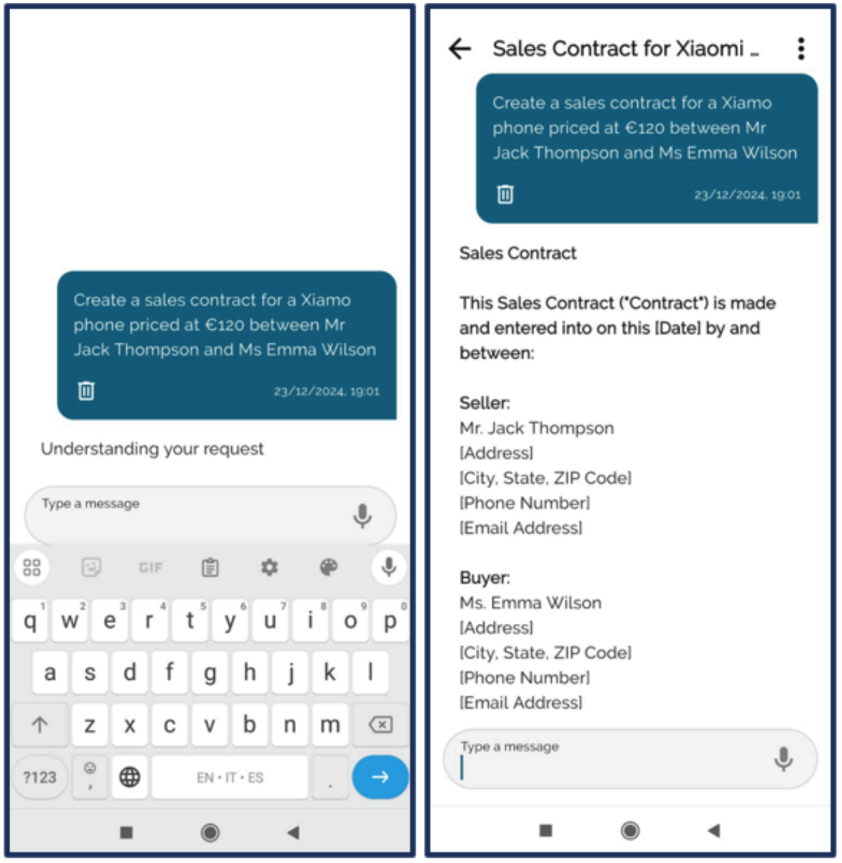
1) Click the![]() button to open a new chat
button to open a new chat
2) Enter the details of the contract
3) Press the send button
4) Edit the information with real details (e.g., tax ID, residential address, etc.)
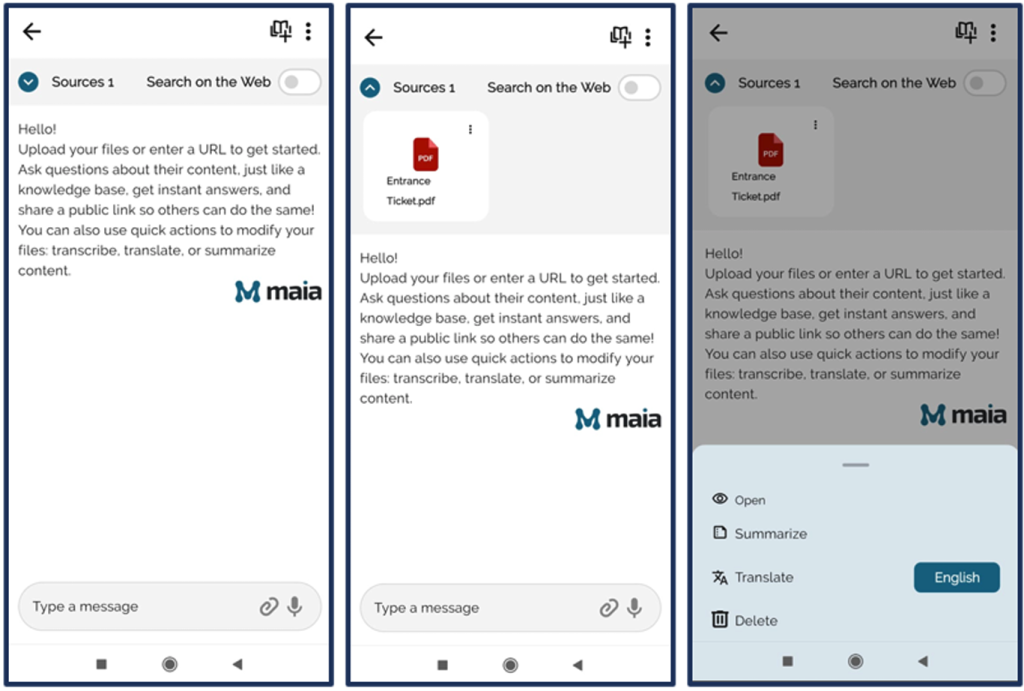
To talk about this feature and understand how to use it, we need to go back to the section dedicated to “My Files” and file uploads (Chapter 3.1 of this manual).
To start using the feature, you will need to attach one or more files to a chat.
First, start a new conversation by clicking the ![]() icon. Once you are in a new chat, you can proceed by attaching a file.
icon. Once you are in a new chat, you can proceed by attaching a file.
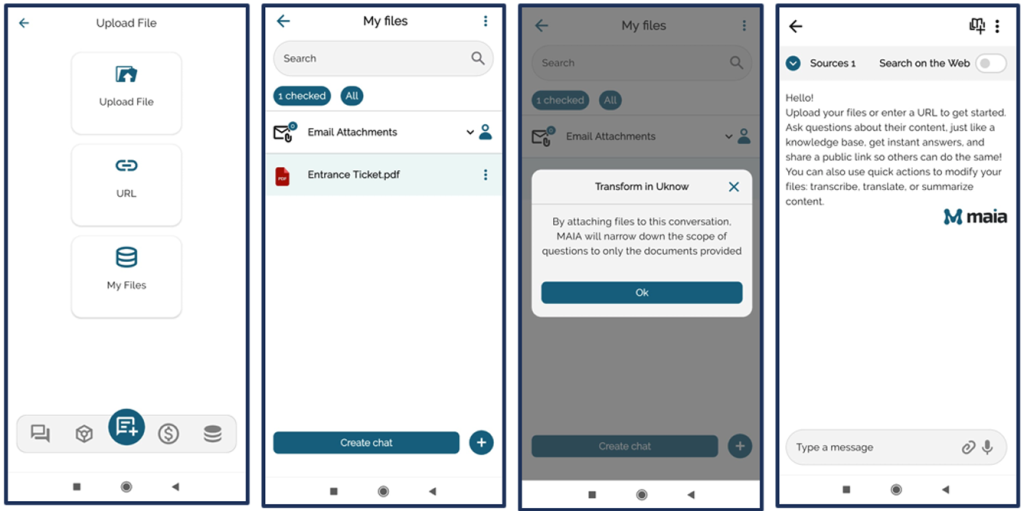
1) Tap the ![]() button
button
2) Choose a file
3) Press and hold the selected file
4) Tap “Create chat”
5) Tap “Ok” to confirm the conversion into Uknow
You will now see a new chat featuring a search box where you can type your question. If you want to attach a second file to the same chat, tap the attach icon next to the search box.
In the top right corner, you will see the icon ![]() . Tap it if you want to name your Uknow, add a welcome message, and attach a welcome video. This way, you can share a generated link and make it interactive on social media. All you need to do is copy and paste your link.
. Tap it if you want to name your Uknow, add a welcome message, and attach a welcome video. This way, you can share a generated link and make it interactive on social media. All you need to do is copy and paste your link.
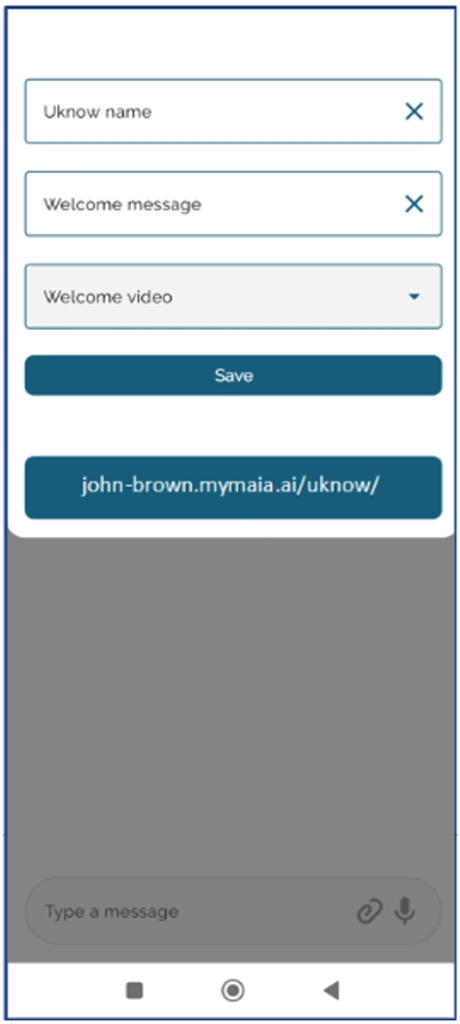
1. Tap the share button ![]()
2. Enter the Uknow name
3. Add a welcome message
4. Add a welcome video
5. Tap “Save”
6. Copy the link to share on your social media
Once a document is uploaded, you can ask Maia to perform tasks such as summarizing or translating its content.
To start using the quick actions, tap the arrow in the top left corner located next to “Sources”, which represents the attached file. Once you expand this section, you will see a three-dot icon ![]() next to your file. Tap it to view all quick actions.
next to your file. Tap it to view all quick actions.